The Multifile Printing dashboard is divided into the following sections:
- 3D Printer Settings
- Printable Cases
- Printing Queue
- Building Platform
3D Printer Settings

| Setting | Content/Meaning |
|---|---|
| 3D Printer | A printer must first be selected to start the multifile printing process. |
| Material Parameter | The material parameter is set as a filter for the design selection at the same time and must also be set to start the process. |
| Material Configuration | The material configuration is required to print and can be set after the material parameter or after configuring the print queue. |
Printable Cases

| Setting | Content/Meaning |
|---|---|
| Filter | The filter criteria available for filtering. |
| Material | All available material parameters can be selected individually or combined with one another. |
| Indication | All available indications. |
| Status | This filter can also be used to display cases already printed and print them again. |
| Column | Content/Meaning |
| Case Number | The case number allocated by the system. |
| Indication | The indication of the displayed case. |
| Material | Material parameter with which the displayed case has been created. |
| Assigned To | Indicates to whom the case has been delegated. See also Delegate |
| Last Modified | Date of the most recent change to the displayed case. |
| V | Opens the case and individual designs are available to select. |
Printing Queue

| Column | Content/Meaning |
|---|---|
| Case Number | The system allocates the case number. |
| Indication | The indication of the displayed case. |
| Material | Material parameter with which the displayed case has been created. |
| Status | Displays whether the design is on the platform (green check mark) or whether there are warnings or errors related to the design. |
| < or > | Minimise or maximizes the dashboard view to make the platform more easily viewable. |
Building Platform
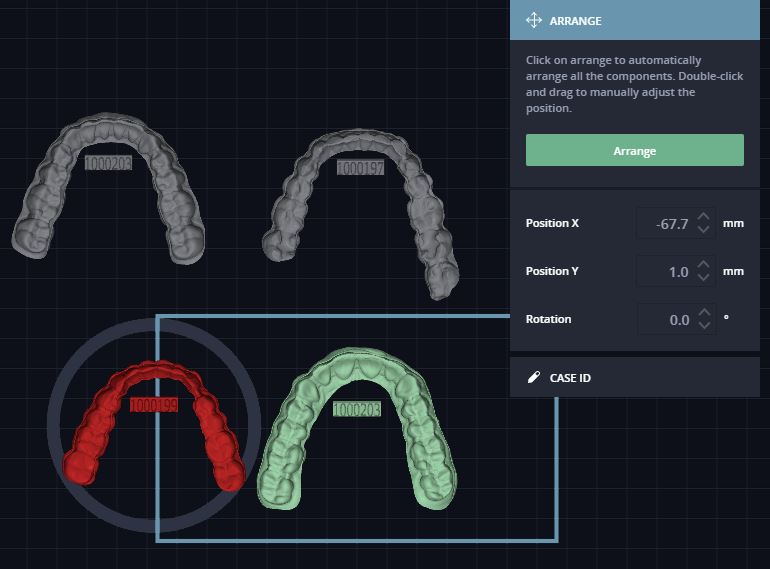
The work platform of the selected printer is represented in the right part of the multifile printing view. The designs from the print queue are represented in different colors:
Gray: Not on the work platform
Green: No errors on the work platform
Red: Not entirely on the work platform/overlap with another design on the work platform
Yellow: two objects too close to one another
The intensity of the colors changes depending on whether or not a design is selected.
You can select a design and manually position it on the work platform by double-clicking on a design.
The Arrange button in the dialogue box opens another dialogue box where you can automatically arrange the designs on the work platform.

The system will generate a suggestion that utilizes the work platform as efficiently as possible. This suggestion can be accepted, or the dialogue box can be closed without changes.
Information will also indicate that not all designs can be arranged on the work platform.
The settings for positions X, Y, and rotation can also be used to set the position parameters for the selected design manually.